Monday, 31 July 2017
Thursday, 27 July 2017
Tuesday, 25 July 2017
Friday, 21 July 2017
The 10 questions a garage door dealer is asked most often
Here, in quick succession, are the 10 questions homeowners ask most often when the time comes to purchase a garage door. There are certainly many … Read More
The post The 10 questions a garage door dealer is asked most often appeared first on Garaga Garage Door Blog.
from Garaga Garage Door Blog http://www.garaga.com/blog/en/the-10-questions-a-garage-door-dealer-is-asked-most-often/
Thursday, 20 July 2017
Thursday, 13 July 2017
Handy DIY Products Worth Buying at the Dollar Store
This won’t be a long post, but during my long saga with the master bathroom reno (next steps should be posting this weekend!), I wanted to pop in about a recent trip I made to the dollar store.

My trip was practically arbitrary, having decided just to stop in really quickly to see if I can find a disposable bucket for grout. I have some old dollar store trash bins I’ve kept in a stack in the garage for years, but I had finally depleted my stash and needed more. I have often used cheap dollar buckets instead of my 5-gallon buckets for tile projects because whenever I mix up materials (tile adhesive, grout, etc.), the product is usually half-dried by the time I start to clean up. This also means that it’s a beast to remove, and can make a huge mess in my yard while I clean everything out. By letting the leftover product simply dry up in the dollar bucket, I can then toss away the entire thing if I can’t get the dried slop to come off cleanly (it’s about 50/50 as to whether or not I need to reuse it).
It was time to restock, but I was very surprised to find a number of other great DIY supplies that I never knew were available. For $1 apiece, these make for some great items to keep around for home repair projects!

On this trip, I got:
- disposable particulate masks
- assorted foam brushes
- batteries
- small utility knives (I love having these all over the house… they are my go-to over scissors)
- 4×6 plastic tarp (decent size for the price!)
- rubber mallet (this was the most surprising find)
- cleaning towels (for wiping off grout haze)
- wrinkle releaser (not DIY necessarily, but good for photography)
- more buckets
- one-time use super glue (I don’t know about you guys, but mine always dry up between uses, so smaller containers is ideal!)
- not pictured: a set of mixing spoons (they came in a set and I’m out of paint sticks, so these were great as disposable mixing paddles)
- not pictured: drain declogger tool

Other items that I saw were available (but I don’t need, so I didn’t get, but worth noting):
- hammer
- level
- screw driver sets
- safety goggles
- tape measures
- work light/flash light (small, but still!)
It occurred to me that since my friends are in that stage of buying homes and such, stopping by and picking up a handful of these things is a great idea for a housewarming gift! I wouldn’t recommend that you buy things like a hammer, or a decent tape measure, or other tools that you really need quality for at a dollar store necessarily, but if a homeowner isn’t super handy and probably doesn’t have them already, it makes a great little gift in case they run into a DIY emergency (and new homeowners always do). If they do have quality tools, they can still appreciate the other items that one can never really have too many of, like tarps, or shop pencils, or utility knives.
Have you found anything at the dollar store that surprised you?
(P.S. Want other gift ideas? Here’s another housewarming or thank-you gift idea. Here’s another.)
The next post in the DIY master shower remodel series is probably getting finished up by the weekend, so be sure to come back for that!
The post Handy DIY Products Worth Buying at the Dollar Store appeared first on The Ugly Duckling House.
Website // Subscribe // Advertise // Twitter // Facebook // Google+
from The Ugly Duckling House https://www.uglyducklinghouse.com/handy-diy-products-worth-buying-dollar-store/
Tuesday, 11 July 2017
How to Replace A Porcelain Floor Tile
Man oh man… I am tired. I have spent the better part of this past week installing the new shower tile, grouting, replacing the shower head, and more in the master bath. Given that it was also Independence Day in the U.S. and most of my family and friends were out celebrating the holiday, being stuck in a small bathroom with bits of water from the wet saw in my hair (a missing splash guard will provide the ultimate hair texturizing spray) and thinset under my fingernails (the ultimate nail whitener?) was not exactly how I pictured a “vacation.”

Those posts — including how I wound up waterproofing the shower, installing the new tile (and some nifty new gadgets that helped), and all of that is coming soon. But first: let’s go back to the floor tile and fix a problem that’s long past due, shall we?
If you read the post about the master bathroom tile floor install, you probably already knew that this post would be coming eventually. If you missed it (it’s right here!), then let me summarize as follows:
If you’re an accomplishment-seeking, DIYing perfectionist like me, never hire someone to do a job you know you’ll be more satisfied doing yourself… even if that takes longer on your timeline. No one else will pay obsessive attention to detail like a homeowner working on their own home.
I wound up almost instantly regretting my decision to hire out the job. I came home to find tiles that weren’t level with each other, uneven grout lines, and messy tile adhesive everywhere. Since my instincts are almost always “wait until I have the time to do it MYSELF,” I was really kicking myself over this error. Most of my anger wasn’t even on the guy who did the installation (as it was a family friend and not a pro/stranger I’d hired, and it was more or less just someone trying to help me out and get at least one thing off my very long to-do list). My main point of frustration was with myself for not realizing that I just needed to have put the project on hold until I was ready to do it.

To be clear, I don’t claim to have more know-how; I just know that I’m going to eyeball every single little imperfection and would always wonder if it could look better if I’d done it instead. That what-if haunts me whenever I see something go wrong (if you’ve ever looked over someone else’s work in your home, you know what I’m talking about).
In some ways, I got lucky: when I arrived home after the tile was in, the adhesive hadn’t get cured enough in some of the worst areas, and I was able to pry up a few and fix them in time (I was admittedly frustrated and almost in tears, but it was not as bad as it could have been if I’d arrived just an hour or two later).

But some, unfortunately, had already dried enough that prying them back up might cause damage to surrounding tiles that were ok enough to leave alone. I hadn’t purchased enough of the tile for me to install the whole floor twice, so I decided to let things finish drying and then fully inspect things once I had enough time to walk away from the project and regroup (for me, a big hiccup in a DIY project can lead to thrown objects, temper tantrums, and a host of other behaviors usually reserved for toddlers and drunk party guests… so, best to just walk away).

That “break” that I needed wound up being weeks… and then months… up to now. I was so bitter and frustrated with my “bad luck bathroom” and all of the weird setbacks it’s had since I first took it apart that it was easier to ignore the problem and use the guest bath (footpath-wise, it’s actually closer to my bed in the master bedroom because of the long hallway that leads to the closet and then the bath).
The thing that finally narrowed my focus again?
- One: I got other rooms in the house like the laundry room back to working order and saw how much nicer things are when things are in proper working order (less chaos? what??); and
- Two: A few sponsors came along recently who are very good at providing deadlines (I know that sponsored posts are easy to hate — and when they’re a bad match, they’re noticeably bad — but it’s also sometimes very hard to beat a combo of a supplied budget and a deadline when you’re way too good at procrastinating! Those sponsors will be revealed with their coordinating blog posts/projects, but the point is, they got me back in the bathroom and working on things enough to make this fix something I was constantly being reminded of by proximity.
So, that’s how I wound up finally sitting down one evening as I finished the shower tile, hammer in hand, and began to take care of the last remaining tile on the floor that needed to be replaced. It had been cut in such a way that one edge was resting on the toilet flange rather than fitting around it, leading to the entire tile lifting too far up on one side. And, it cured that way — meaning that once the toilet was installed, the toilet would likely rock on top of this uneven tile joint.

Lots of things that rock are kind of awesome — horses, chairs, concerts — but not a toilet. I’ve sat on one before… in my sister’s house. I forget every time I use that bathroom and it has surprised the crap out of me (accidental pun!) every time. And I really don’t want that in my master bath.
*this post contains affiliate links*
How to Replace a Porcelain Floor Tile
Since these were rectified porcelain tiles, they were a little different than your average ceramic tile (at least, from my experience). I’ve drilled holes in normal ceramic tile in the laundry room, but my existing arsenal failed when it came to these porcelain ones (I actually picked them out because they’re known to be solid and durable!), so the next best option was to just hammer and chip away at it until it was out. I worried that trying to pry at anything might damage the edges of the surrounding tiles, and any contact they’d had with a power tool also failed (grinding at the tile was louder and more shrill-sounding than I could stand, even with ear protection).
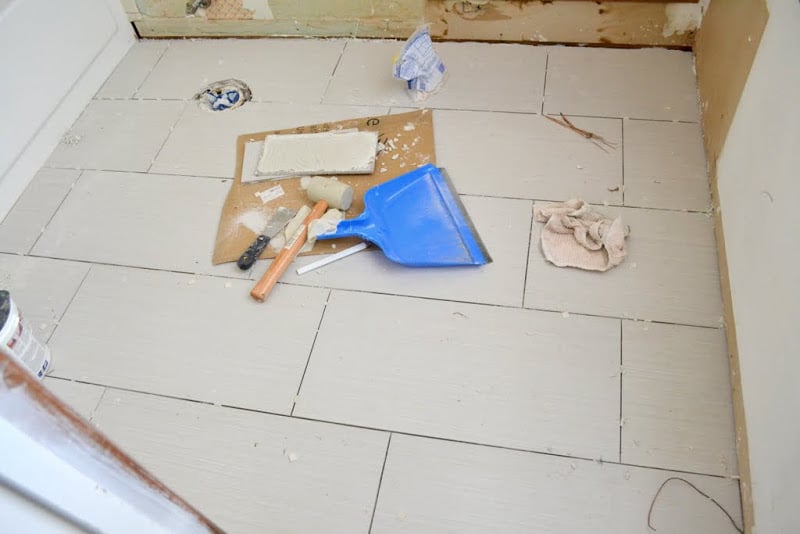
Remove grout (if needed) and grab a hammer.
The grout hadn’t yet been finished, so I didn’t need to first remove anything (if you are trying to replace a broken tile in an existing floor, you’ll need to remove the grout first). So, I just started hitting the tile in a single spot with the face of my claw hammer.
By concentrating on one spot with multiple hammer blows, the first piece cracked. I then moved the hammer a few inches away and hammered again. Once one spot broke, I moved a few inches over again. The trick was to concentrate the hammer in a single spot before moving onto the next section — jumping from one spot to another didn’t do anything except impress me as far as the bathroom floor’s future potential for not showing wear and tear.

Wear proper ear and eye protection.
It wasn’t quick, but it also wasn’t tough to do. Be sure to wear earplugs and eye protection though — little bits will come flying. After I got enough of the tile broken apart, I scooped it into the trash with a dust pan and worked on the next section until the entire tile was removed.

Remove cured tile adhesive.
Believe me, I was hoping I’d get to skip this part. I cut a new tile to account for the toilet flange (remember: around, not on top — not even a little!) and did a dry fit to see if I needed to remove the old adhesive underneath, too. But I could already tell that the added height from the dried adhesive plus the putting down new adhesive plus the new tile was definitely going to cause the new tile to not sit level with the others, which would be a real pain when it came time to grout (and doesn’t really solve the non-rocking toilet thing I was trying to avoid by removing it). So, removing the extra layer of dried adhesive was best.

At first, I tried scraping it with the small pry bar set I had and one of my putty knives. It got a decent amount, but I still needed to remove more.

For once, though, I had luck on my side. Instead of using thin-set like you would in a wet area, the adhesive I’d used for the porcelain floor is vulnerable to water exposure (this is totally fine as long as it’s not a shower floor or a steam room). So, all I had to do is pour some water onto the adhesive, let it sit for a bit (it will bead up at first and then eventually absorb into the adhesive), and then start scraping.
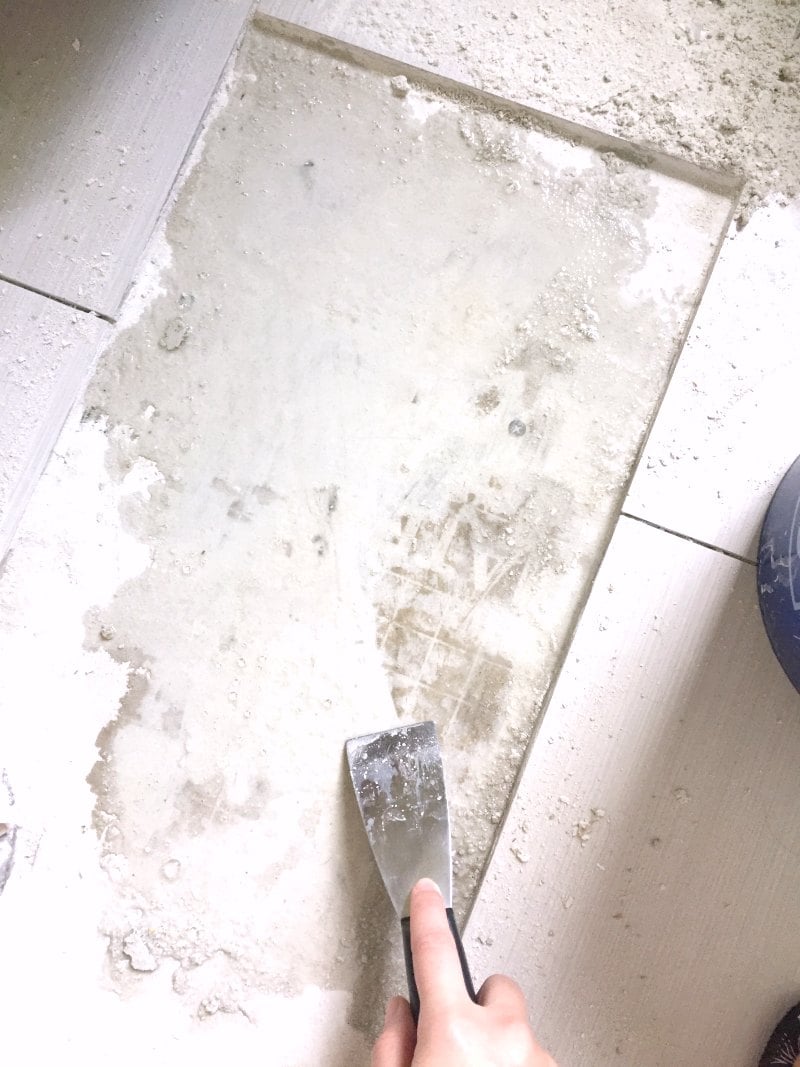
I have a heavy duty 6-in-1 tool I use for painting, but since it’s got a nice tapered edge, it came in handy (nothing against a decent putty knife, but it really didn’t get the job done). A little elbow grease, and most of the bumps and ridges from the dried adhesive were either completely removed or smoothed out enough to allow space for the new tile.

Cut and install the new tile.
If the tile is near an area that needs to be cut, mark and cut your tile on a wet tile saw per usual. Since I was also installing the new shower tile and grouting it this past week, it was easy just to include this tile in with the rest of the items I was working on. Back butter the tile and use spacers that match the existing width of the other grout lines in the tile (I prefer these).

Grout
That’s on the to-do list next, but there you have it — all in all, pretty simple.
The updates on the shower are next, but that will include several parts because I nearly screwed everything up right from the start! I’m serious when I say that it’s like this room has really fought against me…
The post How to Replace A Porcelain Floor Tile appeared first on The Ugly Duckling House.
Website // Subscribe // Advertise // Twitter // Facebook // Google+
from The Ugly Duckling House https://www.uglyducklinghouse.com/remove-replace-porcelain-floor-tile/
Friday, 7 July 2017
Residential garage doors: North America versus Europe
The vast majority—if not to say practically all—of the residential garage doors used in North America are the sectional type. The height of the panels … Read More
The post Residential garage doors: North America versus Europe appeared first on Garaga Garage Door Blog.
from Garaga Garage Door Blog http://www.garaga.com/blog/en/garage-doors-north-america-vs-europe/
Wednesday, 5 July 2017
Where I Get Cheap (But Pretty) Storage Baskets
My storage basket game has been pretty weak for a long time. And until recently, I hadn’t yet resolved my need for storage vs. my penny-pinching ways.

You may not have even noticed if you follow along sporadically, but when I “stage” photos (using that term loosely, as a true staging pro would spend hours trying to get the perfect shot, and I just want to take one in focus before the daylight is gone), I have pretty much been using the same ones all over the house.

The ones in my bedroom and in my entryway? Yep — same baskets, just now repurposed. I will happily dump out a basket I use all the time in favor of getting a better shot when I’m finishing a before/after makeover. I wind up with a mess behind the scenes, but it’s what I have to do to make things work! I do still need double the storage though, so I have found this to be a problem I need to solve once and for all.
The main issue with storage baskets, at least for me, is that they make things look really nice, but the good ones always seem so needlessly expensive. And the cheap ones? The often look really, really cheap — plasticky, the texture is all weird, and the color is just slightly off. I mean, it’s a box. It doesn’t even cook me dinner or taste like wine. So if I’m shopping for something and have to edit items in my cart (ahem, so I can still buy wine), then I almost always wind up putting away the $30 storage basket in favor of other things. But because the cheap baskets are ugly, I wind up not buying that one, either. And I know that I should justify spending money on things when I know I’ll use them for a long time, but with certain items, my white-knuckled grip on my credit card just won’t let me do it.
Until recently. I found a good way to save a few pennies on these wallet-suckers. And here’s the brand name you need to be looking out for: GAIA Contemporary Home. Finding this simple brand name has helped me replace the baskets I need in the entry and still use the others for their original purposes.
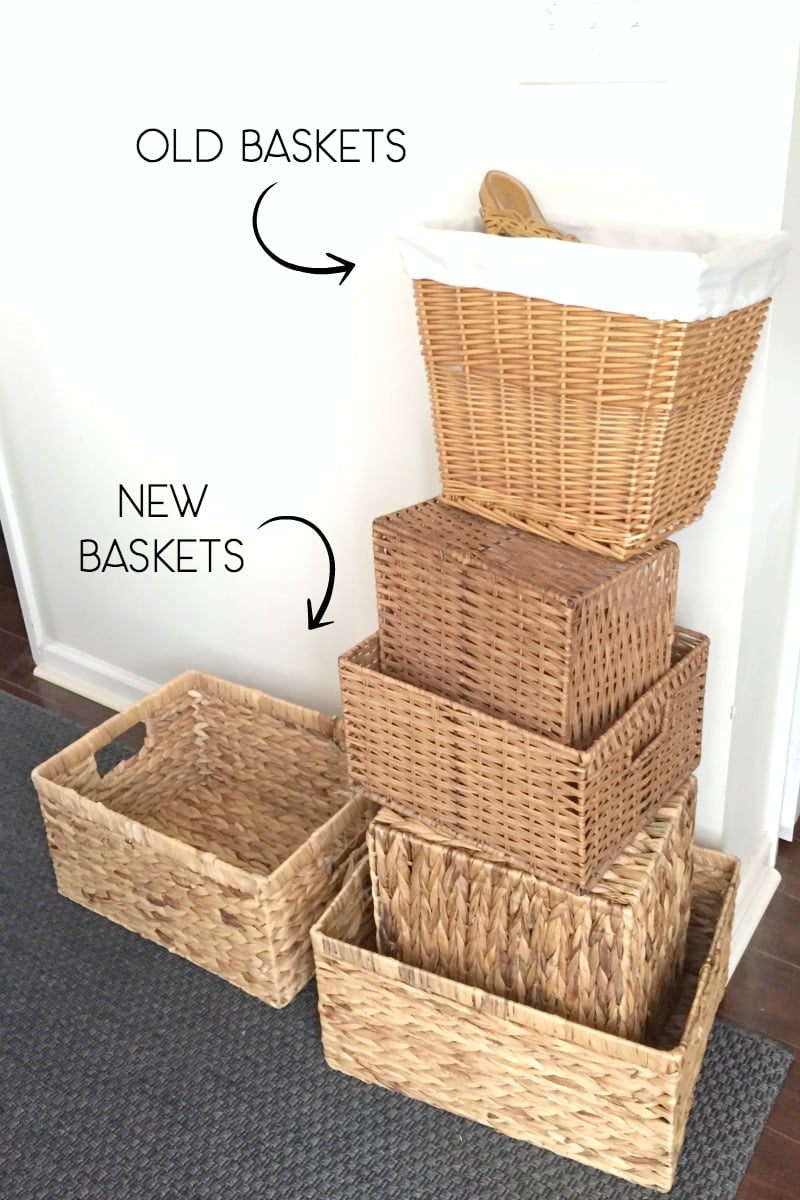
This is not a sponsored post or even one where I can link you to a bunch of examples so you can buy online. I see a handful of them on eBay or other sites, but I can’t seem to find a steady supply for ordering. To get ahold of them, I hit up TJMaxx, Marshalls, or Homegoods.
Homegoods always has the biggest selection, but I find that TJMaxx has them on clearance a lot. So, when a similarly sized basket might cost me $15-20 or even $30 (Target, I’m giving you the side-eye on this one), I can get these for as little as $4 if I’m looking hard enough!

The main benefit of these vs other brands is that I can get these in larger sizes and without spending $100 before I walk out of the store. I know that Ikea has inexpensive baskets too (and now Ikea products are for sale on Amazon! affiliate), but I just don’t like the coloring on those as much (I have some in my laundry room actually, but the color is just a little dull). Usually, the larger ones are where I see the most savings. Trying to find ones that all match and fit neatly is strangely difficult sometimes, so if I find a pretty decent score, I’ll just swipe as many as I can. These have the right shape and the variation in the color of the straw makes it look more upscale to me. I need to get one more medium-sized one for my entryway, but the bigger ones will be perfect in the master bedroom closet!

And… that’s it. That’s really all this post is about. I just wanted you guys to know the name so you can get $4-7 baskets instead of $15-20 ones and spend money on more important things like saving for your kid’s college tuition. Or wine.
The post Where I Get Cheap (But Pretty) Storage Baskets appeared first on The Ugly Duckling House.
Website // Subscribe // Advertise // Twitter // Facebook // Google+
from The Ugly Duckling House https://www.uglyducklinghouse.com/get-cheap-pretty-storage-baskets/
Saturday, 1 July 2017
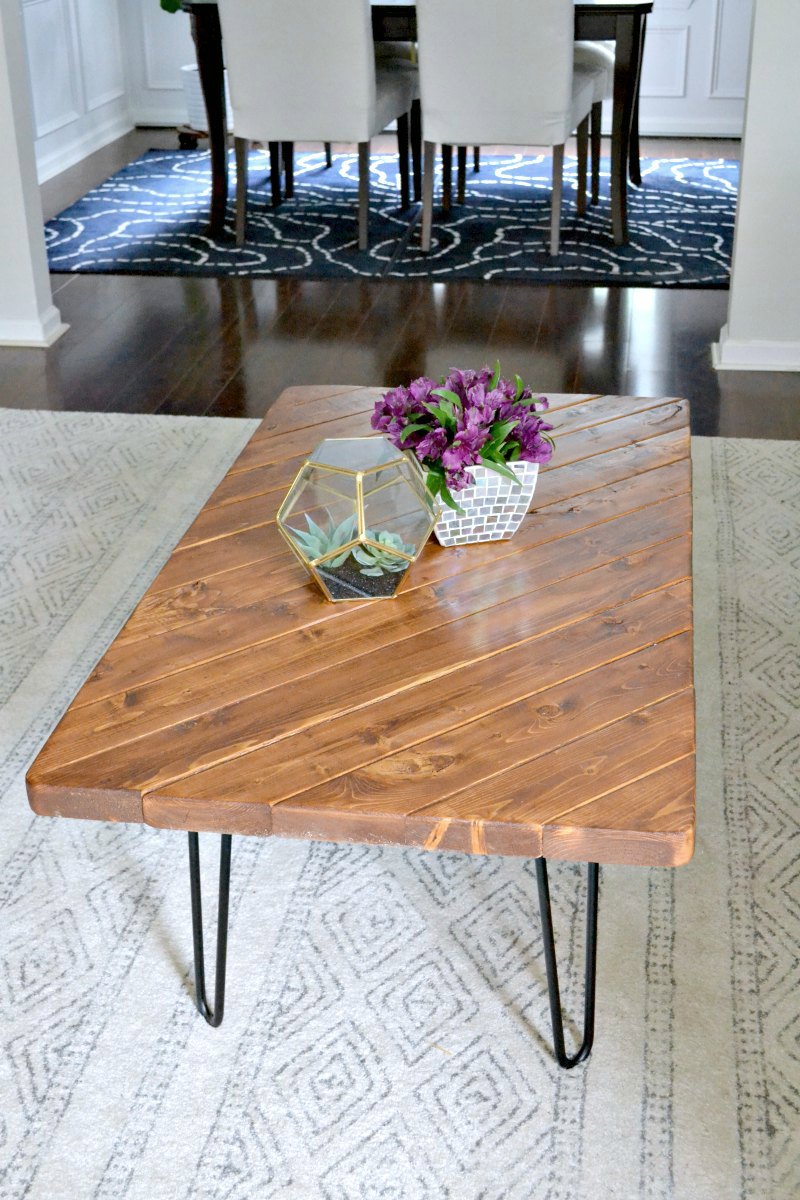
My 15-Minute DIY Coffee Table
Hey folks! I’m anticipating that there are going to be more than my usual readers visiting today’s post because of the #2x4andMore Challenge blog hop from Remodelaholic, so for those of you who haven’t been here before, I’m Sarah — I do lots and lots of DIY projects and have a tendency to make a giant mess. I’m currently remodeling my “bad luck” master bathroom and have about 5,903 other things on my to-do list yet unfinished.
For those of you who have followed the blog though, then today is a day where I fulfill my promise and share the details on that new coffee table I have been hinting at on Instagram. You know — the one I whipped up for a date night because I sold off all my living room furniture and then we had no place to put our pizza. That coffee table.

There’s nothing quite like having a new white rug and nowhere to comfortably rest a glass of red wine that will motivate you to whip up a new piece of furniture! And even though the staining and finishing of the table took the better part of a day, I can honestly say that I cut all the pieces for this table in about 15-20 minutes using only the scrap wood I had on hand.
This post may contain affiliate links, which just means I earn some of my income from making recommendations on products I use. I only endorse items I can honestly recommend, and using these types of links don’t increase your purchase price if you were to make a purchase (I wouldn’t use them if that were the case). Thank you for supporting this site!
I first started with a scrap piece of plywood. Since it was scrap, I wasn’t really concerned about exact measurements, but the plywood was just shy of about 2 feet by 3 feet (the finished table with the 2×4 overhang comes to 25″W x 45″L x 17 5/8″H). I used the scrap plywood to get a sense of how big the finished table was going to look in the room (the scrap on top sticks out on all sides over the plywood eventually, so this is more of an estimate).
I gathered as many scrap 2x4s as I could find — some edges were more rounded because it’s framing lumber, and some is higher grade meant for my furniture projects. Ultimately, I want to have a nice slab or live edge round to make myself a coffee table, so my need for perfection and making everything match wasn’t a top priority (I would make everything look more uniform with sanding and staining later).
I played around with the angles a little until I found a way to use as many of my longer pieces of scrap as I could. The 45-degree angle looked best to me, so I cut a bunch of pieces on my miter saw at 45 degrees and then started lining them up.
As I got toward each edge, I began cutting smaller scrap pieces to square off each side. As you can see, it came together pretty swiftly!

With everything cut, I used a strong wood glue and my set of bar clamps to attach the 2×4 pieces to the plywood. This is only a first step, as I later reinforced things on the back with wood screws when I put the legs on (be sure to pre-drill these holes!).

As for the legs, I ordered hairpin coffee table legs off Amazon a couple of months ago and then forgot about them in the garage (the ones I actually purchased aren’t available as of this posting, so I’m linking to the ones that are the same style but just slightly cheaper). My boyfriend wound up hating the legs. But I built him a coffee table, so… tough (he wound up cleaning out my garage for me so that I could then sand and stain the table, so I consider that win-win if I get to build and he gets to clean, ha!).
Once the table was built, I completed the rest in the garage. The piece is pretty heavy, just FYI!

Because some of the edges were really rounded and some of the scrap was a little warped when putting it all together, I filled in some of the wider gaps or knots with wood filler. I like this stuff since it goes on pink, but if you know of any wood filler you LOVE, please let me know in the comments (I have asked all of my woodworking friends and I have been pretty much trying them ALL trying to find the best all-around stainable, paintable wood filler and have been getting lots of different answers, so it might be time for a head-to-head comparison review).

I sanded the whole piece several times with finer and finer grain sandpaper on my sander (starting at 80 for the rough spots, then 180, gradually working up to 240) and used a router to round off the outside edge. You can get as aggressive as you like with it, but I used the sander at 80-grit to create the rounded corners you see in the finished photos.

To finish, I used a golden mahogany stain and satin finish poly, sanding between coats with a sanding block. Then bam — back into the living room it went!

It was dark before I got a chance to take some photos, but my pup Charlie was really curious about it… so much that I had to make her a model in some of my shots. 


But earlier yesterday, I was able to take a few more photos. I’ve been using it for a couple weeks now, and it has drastically improved entertaining like an adult and not eating food from the floor.


And as for Charlie… she’s still pretty curious about the new item in the living room.

(P.S. I am on the hunt for a new couch to go with the whiter/gray/black color scheme and hope to have that update for you soon!)

There you have it: my #2x4andmore challenge project. If you are making anything out of structural lumber, feel free to use the hashtag this week on Instagram, and be sure to check out the other projects I’ve linked up below (there’s a linky party too if you’d like to share over on Remodelaholic and it’ll be open all week as well). There are some truly great projects in this blog hop, so I’ve included links to the other participants below:

garden arbor | Remodelaholic
15 minute coffee table | The Ugly Duckling House (that’s here!)
tiered corner plant stand | Charleston Crafted
single-board rolling bar cart | Woodshop Diaries
outdoor bench w/rope detail | At Charlotte’s House
wall planter and herb garden | Making Joy and Pretty Things
upholstered x-base bench | Frazzled Joy
jumbo tic tac toe | Ginger Snap Crafts
porch bench | Everyday Party Magazine
console table | Hertoolbelt
farmhouse patio table | North Country Nest
easy flower planters | Our House Now a Home
treadmill incline | Practical and Pretty
patio side table | Small Home Soul

The post My 15-Minute DIY Coffee Table appeared first on The Ugly Duckling House.
Website // Subscribe // Advertise // Twitter // Facebook // Google+
from The Ugly Duckling House https://www.uglyducklinghouse.com/easy-2x4-coffee-table-diy/