Friday, 23 June 2017

The Reason The Master Bath Makeover Has Taken So Long

Raise your hand if you remember when I took out the flooring in my master bath?

ripping out old flooring in master bath

I know. It’s been a long time. I honestly had to look it up myself. And the sobering answer? 2013. I had just nearly finished the guest bath reno and through some enthusiastic encouragement from my dad, decided he and I should immediately start on the master. Because, after all, taking the shit that’s still fully functional out of my house is exactly what will make me get things done, right?

Well, it happened that I was also working on my kitchen and my dining room at the time. Oh, and my staircase, too. My house was one giant blob of chaos. But we did it anyway. I learned new, disgusting things about my house (I still want to make a “What the FRASS?” t-shirt at some point), and assumed that in less than a year’s time (at the most, knowing how I can drag things out!), my master bath would be put back together again.

old master bathroom vanity

As it turned out, the bath would be unfinished for much longer than that. I have been using the nearly-(but not really, either)-finished guest bathroom ever since. But why, exactly? Have I just been lazy? Do I hate showering? Or is it something else?

Well, I can assure you, lazy isn’t how I’d defend this DIY tale — I have been working on a lot. of. other. shit. since. then.

digging-up-tree-roots-with-backhoe

The short answer for why it’s not finished comes down to simple momentum: this bathroom just didn’t want to get made. It has been filled with good intentions and a lot of bad juju. Through one mishap or another, I’ve had false start after false start. And in the end, I had to learn to overcome obstacles in my own time.

  • There was the fact that I was already working on too many projects to begin with — a lot to get distracted with when I don’t really feel like doing tile work (and trust me, you need to be in the mood to do tile work).
  • There was when I thought a pipe burst and flooded the room. It turned out to be just a leaky valve, but I felt pretty defeated from the stress and I ignored the bathroom once more.

And finally, there was the tile floor install. In 2015, I decided enough was enough at one point and thought hiring some outside help would be a good way to jumpstart progress. Unfortunately, it wound up being one of the bigger setbacks. I was hesitant at first, but still really excited when I hired the job and when I left home to allow the work to be done without my hovering (Dad supervised in my absence). I was thrilled to come home and see tile instead of nothing on the floor. Finally!

master bath tile job 2015

But as I took a closer and closer look after it was done and prepped to start grouting, I realized that there had been a lot of miscommunication and the job was not up to my liking. Womp, womp.

I told the guy I didn’t care whether he used a 1/16″ grout line or 1/8″ grout line. He wound up using both rather than picking one, without really much distinction (it wasn’t like all horizontal lines with one thickness and vertical lines with another; some would taper, some would just be thin or thicker, etc.).

different tile widths master bath

I told him not to worry too much about cleaning up the buckets and sponges and stuff after he was done (I was home right after he wrapped up the work, so I would have time to pick up all that stuff). But what I didn’t expect to find was extra globs of thinset all over the room (since this was rectified porcelain tile, we had to use a bag and mix it instead of just buying a bucket of mastic). It was on the tub, squished up between the tiles, etc.

thinset on tub

Many of the tiles weren’t level with each other, which would also be a problem once grout went in. Tiles should pass what’s called a “quarter test”, which means you can run a quarter on the surface without it getting caught on the lip of another tile. As you can see, mine was up to 1/8″ difference in height between some of the corners. My guess is that there had been some stepping on the tiles after they went in, which would mash some of them down and squeeze the underlying thinset out between grout lines (in general, you want to avoid stepping on freshly laid tiles because your body weight will undo your leveling work!).

messy thinset and tile height difference

And finally, the tiles around the toilet flange were not cut to fit well, so part of the tile was resting on top instead of around the toilet opening. The tile itself was too hard to try to correct with a ceramic blade (there are some multi-tools that have certain blades that can cut through tile, but this was not that kind of tile). I was able to pry several pieces up successfully and cut new ones before things cured, but the second tile on the front side of the flange was already hardened. This wouldn’t be just an aesthetic problem like the grout lines; if I didn’t correct this, there was a strong chance that the toilet would not sit flat on the tile or I would eventually have leaks. And no one wants to sit on a rocking, leaking toilet!

incorrect tile cut around toilet flange

Cleaning up all of that wasn’t really what I anticipated, and it wound up being a couple of extra hours that night of scraping half-cured thinset and inspecting everything to try to get it ready for grout. Even though I said you kind of have to really be in the mood to do tile work, tile isn’t really forgiving once it’s in, so if I hadn’t cleaned it up as soon as I found it, I would be in bigger trouble the longer I waited. Fully cured thinset is kind of like concrete when it hardens, and while it wasn’t that tough to get up on glazed areas like the tub, there was a much higher risk of chipping the tile trying to remove adhesive (the floor tile isn’t glazed). If I didn’t get it up between tiles, grout could also be an issue if it’s too thin (it has a greater chance for cracking later on).

master bath floor tile fix

After a couple of hours on my knees and hurriedly trying to clean up the thinset and cut new tiles, I was really upset; not just about the job, or the idea of paying for work that didn’t meet expectations, or having to remove tile and redo the work myself — it was the added layer of family dynamics that also made me feel really conflicted. I hired a family friend to do the work (not the one I’ve had help in the past… a different guy), and I took his word on how much experience he’d had at installing tile (I agreed after he’d done a different type of flooring job for my dad). My dad had only the best of intentions when he kept nudging me to just hire it out and arranged for someone to do it, and the family friend was also just a friendly guy looking for some work and wanted to help.

So, basically, I was stuck between a bad execution and knowing I’d have to confess this at some point and possibly make people unhappy by telling them (it would be inevitable that it would come up; my dad and I discuss progress with my house just about every time I see him, so he would ask more and more questions if I still kept pushing back the grout job after years of not getting this done already). My gut told me to wait and do the floor myself, and I’d ignored it because it seemed like moving ahead was the thing that everyone else wanted to do, and it made sense… and sheesh, I couldn’t argue that it hadn’t been damn long enough! The more I thought about it though, the more I realized that this was a lesson I needed to learn. I’m in my thirties, yet the dynamic with my parents hasn’t changed much; I have often listened to their advice over my own, even with a house they don’t live in. I’m sure that others can relate, but it’s still weird, right?

I don’t mean to say that they don’t have my best interest in mind, but I do think that learning to listen to your own inner voice is a huge thing that a lot of us stumble with — especially if it’s in conflict in some way with those we love and whose intentions are good. I’ve gained a lot of my own skills and developed my own instincts, and I need to learn to trust those more.

I took a few hours to make as many corrections as I could, and while it isn’t perfect and needed at least one more fix (the tile that is resting on the flange), I was a lot happier with the way it looked. Not perfect, but maybe okay enough to not have to rip it all out.

correcting as much as possible in master bath tile floor

When it comes to DIY, eventually, your mojo just starts to wane after a few setbacks in a single room. This tile issue was kind of my last straw of trying to get it done sooner rather than later, so once again I put it off. Sure, it was ridiculous that I had an entire room and square footage I wasn’t using, but it’s only me that lives here, so if I wasn’t ready and had a working bathroom, I just plain stopped caring. I told myself it was fine to wait, and it’s ok to let yourself work on the other things you’re passionate about and wait for inspiration. To get my momentum back, I had to work on other things that made me feel like I was accomplishing something. Lots of somethings. So, I did.

subscribe for free to the ugly duckling house newsletter

And now, finally, I found that inspiration and the materials to get things done right — even after another setback yet again, but that’s for a different post. This time, I have a deadline and I’m setting that goal to meet it, head on, challenges and all. I’m even doing more upgrades than I thought when I first started. I can’t wait to show you the plans! More on my inspiration should be posted by next Friday, but demo posts begin first thing next week!

The post The Reason The Master Bath Makeover Has Taken So Long appeared first on The Ugly Duckling House.

Website // Subscribe // Advertise // Twitter // Facebook // Google+


from The Ugly Duckling House https://www.uglyducklinghouse.com/reason-master-bath-makeover-taken-long/

Friday, 16 June 2017

Things That Make a Busy Life with a Dog Far Easier (+ Giveaway)

It’s Pet Week part 2! If you missed part one, see this post.

For those who have never read this blog before (or haven’t read for long), let me introduce you to the other major character in this DIY adventure: Charlie…

Charlie 2017

Both she and my decorating habits have changed a lot over the years…

old IKEA rug with puppy Charlie

When she’s happy and relaxed, our life at home is pretty quiet:

Charlie relaxing in bed with me and my laptop

More often than not, this is a more realistic picture of her:

dogblur

Over the years, I’ve had to make lots of adjustments to keep her happy and me sane. At times when I worked in an office, it meant turning down jobs that would make me travel so much that she would be boarded all the time. Now that I work from home as a full-time blogger though, you would think it makes everything easy — but while it is nicer for a dog in many ways, there are still obstacles we have to work on together:

  • I do conference calls with brands while at home. Which is usually right when the UPS guy decides to deliver something and send my dog to DEFCON 3. Not even working in a home office with the door closed makes this ideal.
  • DIY projects, tools, and related dangers are all around, and she likes to be directly in on the action (and even sometimes underneath my ladder).
  • She’s a the medium-to-large size, which means my family likens her to a GIANT and don’t always know how to deal with her size compared to their smaller dogs.
  • Her size also means heavy bags of food to carry around, larger spaces on the couch (someday I hope to get a decent picture of her thinking she can fit when she totally doesn’t), pet beds that can’t be neatly hidden, easy counter and table access, etc.). Luckily, she is well trained enough not to climb on things and understands unattended food does not mean her food, so it’s mostly just her climbing the fence that I worry about.
  • Lots and lots of dirt and fur tracked into the house (to think, I used to want this to be a no-shoe house… HA!)

Adjusting to having a new puppy in the house meant a lot of changes right away when I first adopted her, but after a few years, I learned about those super awesome pet-related things that I had no clue about for a long time: new products, new websites, and other things that make maintaining a busy life with an active dog even easier. So, as I promised earlier, here’s that list! If I ever find other things, I’ll continue to add to this same post (for easy bookmarking later). And there’s also a giveaway from one of my sponsors, Swiffer, below — so be sure to enter with a comment this week and in the widget at the bottom of this post (if you don’t see it in your reader, click over to the post in your browser here).

*some links contain affiliates*

My DIY elevated feeder — I already explained how my DIY project from last year fixed Charlie’s habit of tossing over her food bowl, but it’s worth repeating! Since having built it, there has been far less food on the floor (not zero food, but she’s still a dog… still a messy eater, but she usually keeps it in the bowl now instead of turning over the bowl and eating it all directly off the floor).

Before:

Charlie likes to turn her food bowl onto the floor

After:

easy to build DIY dog feeder with full instructions

Microfiber floor mats — I have two microfiber floor mats, one at the front door and one in front of the patio, that are specially designed for catching mud and fur whenever Charlie enters and exits the house. It’s not fool-proof, but it does make a significant difference for me whenever it’s a rainy/muddy/dirty day outside and I don’t want her tracking the muck into the house. I find that since having used them, I am spending less time and effort trying to wipe each of her paws with wet wipes, and my floor doesn’t suffer.

Grooming wet wipes — Of course, now that I’ve got my new block print rug in the living room (and as a fan of lighter colored rugs in general), I still have to wipe their feet. Even though I could use a cheap paper towel, I like the dog wipes for paws. These anti-itch wipes are great for treating Charlie’s allergies (if you’ve ever seen your dog licking or chewing their paws after coming inside, you know what I’m talking about) and I like these grooming wipes as well for when Charlie has a dirty playtime at the park — Georgia red clay is no joke! I buy the bigger containers for savings.

Rinse-free/waterless dog shampoo — Charlie is an anxious dog. And when it comes to regular grooming, it was a LONG process just to even get her to take a bath. She’d freak out to the point where groomers won’t even take her, so I had to re-train her at home. I started with this rinse-free shampoo to keep the time in the tub to a minimum, and it made a huge difference. Over time, I’d use the same shampoo, but incorporate water so she’d get used to it, eventually graduating to deeper cleans. She learned to love the massage and being brushed, and now we can get through it without trauma or me getting soaked to the bone from trying to keep her in the tub. The rinse-free alternative truly did give me some relief (and still does if she needs a quick bath but I don’t have the time or energy for a longer one).

Oatmeal shampoo — if your dog is itching a lot from allergies or fleas (even if you use good flea treatments, they can still get bitten and itch, especially when warm summers like this year mean more summer fleas!). This one is highly rated.

Swiffer — There’s a reason I fully embraced working with this brand as a sponsor of the blog! I use Swiffer all the time. Charlie is a shedder — a massive, unrelenting shedder. Even after first using a good floor vacuum that can pick up her tumbleweeds of hair, I still have to go back through with a Swiffer Wet Jet to take care of all of her paw prints and use their dry cloths to take care of lots of other surfaces. Whenever one of my friends gets a new house or pet, Swiffer products are a very welcome gift (and you can get your own gift by entering the giveaway below!). Oh, and I forgot to mention in the last post: they actually reformulated their wet jet so that it no longer leaves streaks on laminate floors like mine. It used to be my biggest gripe with their products, and their development team took that feedback from lots of folks reporting the same thing and went looking for a better solution (pun-intended).

Food delivery — After discovering the mud mats mentioned above, I went searching for other smart solutions on pet-related websites. I found my answer in the form of automated dog food delivery. I try to give Charlie the best food I can afford, and I order the BIG bags. And since I also subscribe for steady delivery, I get another 5% off. The end result is that it actually beats the price I was paying to drive to a store like Petsmart, but I don’t even need to put on pants or feel guilty that I forgot her food during my last errand for groceries (which sometimes means she gets people food when I run out, but it’s not great for her digestion).

A rolling food bin — I haven’t finished the pantry makeover, but an improvement I made several years ago was a simple investment in a rolling bin that was large enough to fit an entire large bag of dog food. Given that the cheapest price per pound of food is in the large bags, I would buy in bulk, but when I was using a smaller bin, it meant that I could only store a small amount each time in the previous plastic container and had to keep the rest elsewhere (which is a quick way to clutter). I think I only spent $20 on a new bin that also had rolling wheels and a flip-up top, but the mileage and convenience I get out of it is night and day. It just goes to show, once again, that investing in the right products for your house (even if it costs a little bit more than what you were using before) is a smart move because it can save you time, money, and square footage.

“Tough” stuffed dog toys — There’s unfortunately no stopping the gutting of a stuffed toy sometimes. Even when they’re labeled something akin to indestructible, I look at the claim and laugh, because Charlie will eventually find her way inside the stomach of that toy if it contains a squeaker. I’ve learned to just embrace it, but buying “tough” toys instead of the cheap ones still mean she usually hangs onto them a little longer, and that added time is easier on my costs long-term (I pay more upfront, but she hangs onto them long enough for break even or better). Sometimes she’ll have a favorite and keep them intact for months, and others will last just a few weeks, but less cleanup and a happy dog who is quiet during conference calls is a win-win for me!

Honestly, that’s all I can think of for now, but I’ll add more as I think of it! It’s also a great question in terms of a special giveaway:

Giveaway question: What products or services have you been grateful to discover in caring for your pet?

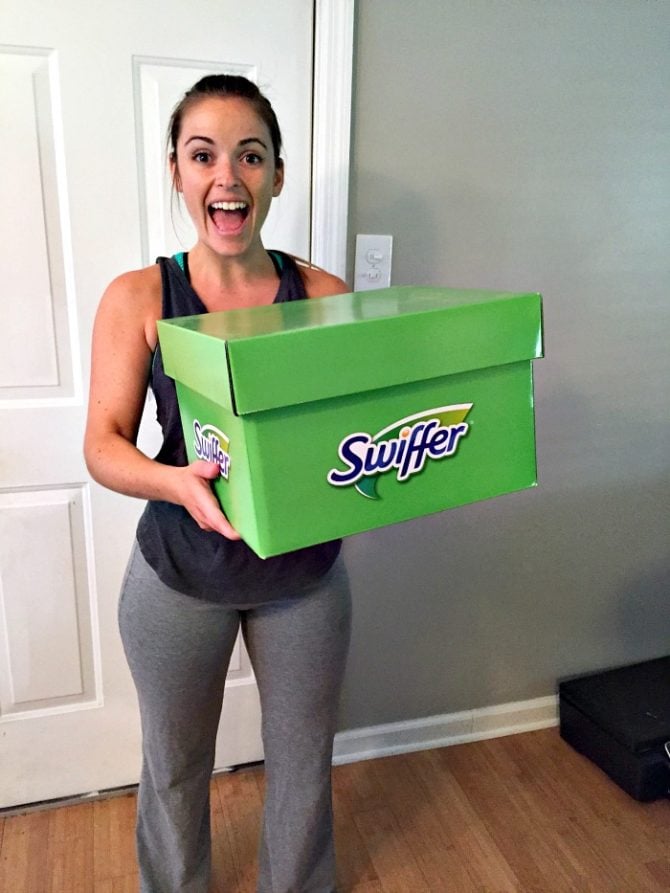
Leave a comment on this blog post for a sweet goodie box from Swiffer! Be sure to also update the Rafflecopter widget too. I actually just asked them as I was writing this post if they would throw in something for you guys (another reason why I like working with them — they really have an awesome and super flexible team), so I don’t have details on precisely what you’ll wind up with, but the box is generally this size (photo is of my sister modeling one of her housewarming gifts):

Emily housewarming gift box Swiffer new mover

Full giveaway details:

  • Prize: a sweet goodie box from Swiffer to help you & your pet keep things fresh & clean (any package I’ve gotten from them includes ample refills to last a while)
  • Number of winners: one
  • Geographical restrictions: U.S. only (that’s usually how it goes, but if that’s not the case I’ll open it up further!)
  • Ends: Friday, June 23 at 11:59PM
  • To enter: leave a comment on this blog post answering my giveaway question & update the embedded widget (if you have trouble with the widget, please let me know, and if you don’t see it, make sure you’re clicked over to my site directly!)

Ready? Go! And thanks in advance for your tips and recommendations on other items… I hope Charlie and I discover something in the process!

a Rafflecopter giveaway

Disclaimer: This post and giveaway are sponsored by Swiffer, but as always, all text and opinions, embarrassing stories, and bad jokes are 100% my own.

The post Things That Make a Busy Life with a Dog Far Easier (+ Giveaway) appeared first on The Ugly Duckling House.

Website // Subscribe // Advertise // Twitter // Facebook // Google+


from The Ugly Duckling House https://www.uglyducklinghouse.com/things-that-make-a-busy-life-with-a-dog-far-easier-giveaway/

Here are some good reasons to replace your old garage door opener

Does your garage door opener look like something used by Fred Flintstone? Do you have to go through all sorts of contortions with your opener … Read More

The post Here are some good reasons to replace your old garage door opener appeared first on Garaga Garage Door Blog.


from Garaga Garage Door Blog http://www.garaga.com/blog/en/good-reasons-replace-old-garage-door-opener/

Thursday, 8 June 2017

The Gardenia Garden Beds Are Thriving!

Remodeling a house and a yard can often feel like a mirror for everything else that goes on in my life. I subtract to then add, fill up too much and purge, clean up, neglect, scramble, underestimate, second-guess, and conquer. I fight my instincts. I follow them. And in the end, the house creeps toward a goal and a future I can only see the fuzzy edges of, but I know it’s there.

gardenias blooming

I find I reflect most on these things when I’m out gardening. What I find strangest of all is that I’ve somehow become the sort of person who could even use a sentence like that — when not long ago, less than maybe five years? — the very idea of having anything growing and thriving like this would have made me laugh in denial. And now?

gardenias growing like crazy

To be honest, the gardenia garden beds have had a lot of ups and downs. After first creating the raised beds and finding a proper way to mulch, they’ve stayed relatively weed-free, despite my lack of hands-on upkeep (save for clipping down the occasional bamboo shoot — which again, please, never ever grow bamboo! Your neighbors will be forever grateful and your fence won’t get destroyed like you see in these pictures).

charlie with smaller gardenias

Just a few short months ago, before the grass really started to take hold, the yard looked patchy, and the gardenia beds did, too. The neighborhood dude I’d hired to occasionally mow my yard had piled huge mounds of dirt into the beds, which smothered some of the roots and they didn’t make it (believe me, I was irritated… I had asked him to distribute a remaining small pile of dirt from the big leveling project out into the back yard where he found low spots, and he instead decided to just dump them into my raised garden beds, but in a way where the foliage kind of hid the piles until some of them started to die off until I found them this spring ðŸ˜¡). Luckily, I was able to save a few, was able to replace the ones that died (most nurseries carry 1-year guarantees if you have a receipt, so I just took the dead ones back), and moved them around so that there are 4 plants per bed, totalling 12 instead of the original 9.

gardenia garden beds starting to grow in

This means that some of the plants have grown in healthy while others are still just getting established, but it’s better than sickly twigs and zero blooms. And the new grass is really making the whole yard look incredibly healthy. It’s like a lush, green carpet. But wet.

back yard with green grass

Because some of them are root-damaged or otherwise limping along, I decided that this year will be another year of neglect for the entire gardenia bed (except for a good weeding and mulching), to allow them to get re-established and grow a little bigger before I trim them back. When blooming season is over (these are called “August Beauty” – affiliate link – so they are meant to re-bloom all summer), I’ll do some pruning and get things looking less scraggly.

garden beds growing in

Ultimately, they should grow as tall as the fence line, giving it some much-needed camouflage for my yard’s overall aesthetics. I’m thinking of also adding a small strip of crushed stone just in front of the beds, to make it look like an even crisper division between the grass and beds and tie in the crushed stone I’m adding to the new hydrangea corner garden (more on that in a future update, of course!).

It may not be perfect. It may be right up against something else I find ugly and have very little control to do anything about (neighbor’s fences are like that, unfortunately). But after all that hard work, trial and error, I really did seem to make something better. And the intoxicating smell of these gorgeous white flowers will soon be part of my interior, too — I can’t wait to clip off some of the blooming stems and make the first “this all came out of my own garden!” bouquet!

The post The Gardenia Garden Beds Are Thriving! appeared first on The Ugly Duckling House.

Website // Subscribe // Advertise // Twitter // Facebook // Google+


from The Ugly Duckling House http://www.uglyducklinghouse.com/gardenia-garden-beds-thriving/

Tuesday, 6 June 2017

How to Fix a Leaking Outdoor Faucet

So we’re going to call this technically a tutorial, but in all honesty, fixing my dripping outdoor faucet was one of those figure-it-out as you go things. And whenever I post about something like this, I feel like it’s only fair to remind you guys that I am not a professional contractor or have a lot of clues on what I’m doing before I start trying to fix something in my house. And that’s also why I often screw up a couple of times before I finally figure out how to resolve the issue long-term. Got it? Good. But anyway, my outdoor faucet no longer leaks or wastes water, and I can finally put my laundry room back together!

how to repair a leaking outdoor faucet

Disclosure: a handful of affiliate links to products I used are in this post.

Remember how I made over my little laundry room last winter? Well, what I didn’t mention — and actually forgot about until spring — was that the outdoor faucet that sits directly on the other side of the back wall was dripping and had been turned off all winter. For obvious reasons, I had postponed this fix until the weather started to warm up, but in my haste to meet a makeover deadline, I forgot all about how quickly I would need to take the new plywood counter back out of the laundry room so I could get access to the shutoff valve behind the dryer. Sigh. Two steps forward…

laundry room shutoff valve

Gaining access to turn the shutoff valve on and off proved to be… a bit cramped. To take the counter out, I would need to also remove the mirror on the right side. I would also need to remove the items on the counter, remove the antique washboard, and move the dryer back out of its neatly tucked-in spot. So, I basically had to deal with an unkempt, disorganized room again until I finally fixed the faucet. But, man — I got a brief taste of that sweet, sweet organized laundry room life — and I really wanted it back.

finished laundry room makeover

The main problem with fixing a leaky faucet like this is that it looks pretty intimidating. The faucet is clearly old and weathered, not to mention is directly embedded right into the stonework on the front entry porch. With every turn of the handle, water was leaking directly out of the valve, and I could never seem to tighten it enough before it would slip and the connection would be leaking again (you know when you’re turning a faucet to tighten it closed, and then it slips, and then you try to tighten it again? That.). When the hose was attached, most of the leak could be somewhat contained, but I also knew that this was wasting a lot of water. And I really, really didn’t want to have to solder on a whole new faucet, so I started researching what the likely problem could be.

old leaking outdoor faucet

I was hoping this would be quick and easy, and most videos I found online (like this one) suggested it could be as quick as needing to tighten the packing nut with some locking pliers (the chunky hexagonal part) or switching out a worn washer that was causing the slippage. But after trying to tighten things down, the leak remained.

tighten packing nut

According to the videos, that meant the next least-expensive fix was to try to replace the washer. To do that, I would have to turn the water off, and that’s where I started to get frustrated. The simple math is that there are only so many times a gal can mash her boobs and contort herself between a dryer and a wall until she starts to lose her patience — especially when you think you’ve removed the right part only to realize that you basically just mashed and removed a different part of the faucet components (or if you’re a vocabulary nerd, the “hose bibb”). What I thought was a washer just wound up being another worn, rubbery part of the existing faucet. Womp, womp.

jeopardy parody joke

Another challenge with a “simple” fix like this is that there aren’t a lot of laymen’s terms involved with trying to find the correct replacement parts. The washers are in a totally different part of the store (or at least, in the stores near me) than the section where you’d find new outdoor faucets, so I wasn’t sure if I was buying the right thing or not. And you can go to a store all confident, telling yourself “ok, 1/2-inch washer, looks black and rubbery, I totally got this” and still find yourself staring at an entire display of lookalike washers like a deer in the headlights. And that’s when your doubt starts to creep in.

Could the new ones be a different color these days? The one I’m trying to replace is like 30 years old; perhaps there’s a new standard and it looks totally different? Why can’t I find a nice variety pack like there are for wire nuts? Argggg, I’m out of here.

It’s also how a project that’s supposed to be easy can be undone as quickly as your confidence, and gets delayed with another two months of chaos in your laundry room.

leaky outdoor faucet repair

In the end, I went back to the store and just bought an entirely new outdoor faucet that looked pretty much like (albeit, much shinier) the one I was trying to fix. When the difference is between the $2 bag of washers you aren’t sure is going to work versus the $6 faucet that you can take apart and just replace the entire valve stem, you go with what seems to be the path of least resistance. Plus, I figured that even if I did fix the washer issue, there was still a chance I would have leaks with having removed the wrong thing beforehand (so take that lesson from me: you could save a few bucks by not making a simple fix more complicated).

bad washer on outdoor faucet

So, that’s what I did; I took home a new faucet and took apart the valve’s “stem” components from the section on the bottom (since that was already attached to the stone facade, I didn’t need that). To loosen the one on the faucet, it was suggested I try some acetone to clean the gunk (I used nail polish remover) and yank it off with locking pliers. That thing was really on there, and I was bleeding from my knuckle, but eventually, it finally popped off.

removing the old valve stem

The new version came with all of the washers it already needed, and since it was the same size (1/2″), it went right into the old pipe without needing further modification. A quick turn in the laundry room to let the water flow once more, and voila! No leaks!

new outdoor faucet replacement

Now, I just need to put the laundry room back together again, and we can call this home repair project complete!

The post How to Fix a Leaking Outdoor Faucet appeared first on The Ugly Duckling House.

Website // Subscribe // Advertise // Twitter // Facebook // Google+


from The Ugly Duckling House http://www.uglyducklinghouse.com/how-to-fix-leaking-outdoor-faucet/